
What is Guest Posting
Guest posting is the most popular way to Get Traffic into your Blogs. Many big Blogger is use in this way at a time.
It is Just Simple, many Websites are Provide Guest Posting Features. It’s work actually Web 2.0 features. Give a Some Request Section to most type of blogs, you can Submit Your Post and Admin is Review Your Post and they approve this and Successfully Show your Post.
Different Way To Guest Posting
Guest Posting in Generally Two Types
- Free Guest Post
- Paid Guest Post
If you integrating this Code to your Blogs, You have some benefits Like You can Creative Your Customisable HTML Guest Post Form, Anyone Submit Their Post to Your Blogs after approval.
Benefits of Guest Posting
If You are Provide Guest Post Facility, both have benefits.
- Guest posting will never cause a lack of content on your website.
- Increase the Domain Authority and Page Authority.
- If you set some rules for guest posts on your website, you will only get quality content for your website.
- Huge Traffic to Your Blogs.
- Your website’s Alexa rating will increase its benefits.
How To Add Guest Post Page on Bloggers
First Open Blogger Dashboard >> Select PAGES section >>
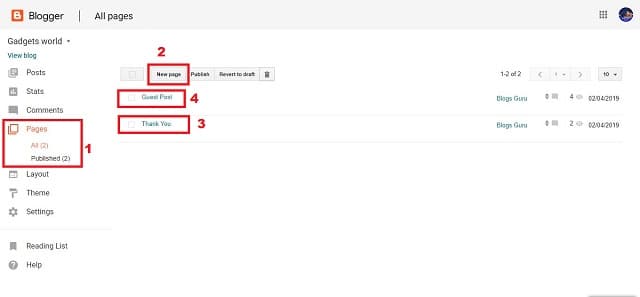
Create First Thank you Page and Published Then Create Guest Post page. But don’t Publish Guest Post pages.
Open This Guest Post Page.
Then Next Tab You Click on >> THEMES Section and Click on >> EDIT HTML

Then Open Your Theme’s HTML Section Press on >> CTRL+F

Copy This Code ]]></b:skin> and Paste This Search bar and OK. Indicate the Highlihted are and Copy this code
.form-style-6{
    font: initial;
    margin: 10px auto;
    padding: 16px;
    background: #F7F7F7;
}
.form-style-6 input[type="text"],
.form-style-6 input[type="date"],
.form-style-6 input[type="datetime"],
.form-style-6 input[type="email"],
.form-style-6 input[type="number"],
.form-style-6 input[type="search"],
.form-style-6 input[type="time"],
.form-style-6 input[type="url"],
.form-style-6 textarea,
.form-style-6 select
{
    -webkit-transition: all 0.30s ease-in-out;
    -moz-transition: all 0.30s ease-in-out;
    -ms-transition: all 0.30s ease-in-out;
    -o-transition: all 0.30s ease-in-out;
    outline: none;
    box-sizing: border-box;
    -webkit-box-sizing: border-box;
    -moz-box-sizing: border-box;
    background: #fff;
    margin-bottom: 4%;
    border: 1px solid #ccc;
    padding: 3%;
    color: #555;
    font: initial;
}
.form-style-6 input[type="text"]:focus,
.form-style-6 input[type="date"]:focus,
.form-style-6 input[type="datetime"]:focus,
.form-style-6 input[type="email"]:focus,
.form-style-6 input[type="number"]:focus,
.form-style-6 input[type="search"]:focus,
.form-style-6 input[type="time"]:focus,
.form-style-6 input[type="url"]:focus,
.form-style-6 textarea:focus,
.form-style-6 select:focus
{
    box-shadow: 0 0 5px #43D1AF;
    padding: 3%;
    border: 1px solid #43D1AF;
}
.form-style-6 input[type="submit"],
.form-style-6 input[type="button"]{
    box-sizing: border-box;
    -webkit-box-sizing: border-box;
    -moz-box-sizing: border-box;
    padding: 3%;
    background: #43D1AF;
    border-bottom: 2px solid #30C29E;
    border-top-style: none;
    border-right-style: none;
    border-left-style: none;
    color: #fff;
}
.form-style-6 input[type="submit"]:hover,
.form-style-6 input[type="button"]:hover{
    background: #2EBC99;
}
Then Paste just above this code add the below code. Then UPDATE your Themes and SAVE THEMES and Close this Tab.
Create Your Guest Post Form
Now Open the GUEST POST Page >> PAGES Choose >> edit. Then Choose on >> HTML Section

Delete the Existing Codes and Copy the Code on Bellow.
<script src="https://dl.dropboxusercontent.com/s/htbxax1y39i5oak/guests.js" type="text/javascript"></script>
<script type="text/javascript">
     bkLib.onDomLoaded(function() {
          var myNicEditor = new nicEditor();
          myNicEditor.setPanel('myNicPanel');
          myNicEditor.addInstance('wysiwyg');
     });
</script>
<div class="form-style-6">
<form id="contactform" method="POST">
<input name="name" placeholder="Your name" type="text" />
<input name="_replyto" placeholder="Your email required" required="" type="email" />
<textarea name="Details" placeholder="This is an optional section. You can tell about yourself and post Your social links and site links here." required="" rows="6" style="width: 50%;"></textarea>
<input name="Post_title" placeholder="Post Title (Required)" style="width: 85%;" type="text" />
<h3>
Write Post below</h3>
<div id="myNicPanel" style="width: 83%;">
</div>
<textarea id="wysiwyg" name="message" rows="20" style="background: white; overflow: scroll; width: 85%;"></textarea>
<input name="tags" placeholder="Enter your tags/label/category (optional)" style="width: 85%;" type="text" />
<input name="_gotcha" style="display: none;" type="text" />
<input name="_next" type="hidden" value="https://www.blogsguru.net/p/thank-you.html" />
<input type="submit" value="Post it for review" />
</form>
<b>

</b> <b>Please, Don't post Spam!, Spams are excluded Automatically.</b></div>
<h2>
Guidelines for guest posting</h2>
<ol>
<li>Guideline no. 1</li>
<li>Guideline no. 2</li>
<li>Guideline no. 3</li>
</ol>
<script>
    var contactform =  document.getElementById('contactform');
    contactform.setAttribute('action', '//formspree.io/youremail@gmail.com');
</script>
Now Edit This HTML Codes. Press CTRL+F Now Type on >> thank-you >> highlight Area and Replace Your Thank You page Link.
Now Open Thank You page >>

Then Replace Your Email address where write youremail@gmail.com . Replace Your Own Email address. Then Publish Your Page. Finish and Successfully Create Your Guest Post Page.
If You are facing any issue to regarding This topic, Then Must watching this Hindi Video tutorial.
Thanks for Spending your Valuable Time, If this article helps you, be sure to share it.
well this help me to add a guest post option in my site.
Awesome
Nice post bro
VERY NICE SIR G
Bahut badhiya
nice bro
Nice Video
Good
Nice:
AM Searching web developer FOR CREATE NEW WEBSITE. WHO MAKE WEBSITE FOR ME. I WILL PAY 50 DOLLER.
Follow the contact us page and Send your Requirements
wow nice article thanks for sharing
Very an informative post admin thanks for sharing.
only watch movies information and share
This is a fantastic website , thanks for sharing.